Deviled Eggs are a perfect, two-three bite appetizer that will be a guest favorite whether you're hosting a backyard barbeque, a Super Bowl get together, or an elegant dinner party. Many years ago, during Phase 3 of my culinary program, I had the opportunity of working at Alchemy Caterers under the tutelage of Carla Hall. She added a unique ingredient to her deviled eggs, pickle juice, which was unexpectedly delicious. That salty, briny, acidic pop of flavor really makes the difference, but you'd never guess what it is that makes these so good!
INGREDIENTS
- 6 Large Eggs preferably 1-2 weeks old
- ¼ Cup Mayonnaise
- ¼ tsp. Yellow Mustard
- 2 tsp. Pickle Juice
- ¼ tsp. Freshly Cracked Black Pepper
- Paprika optional
- Snipped Chives optional
- Kosher Salt ONLY if necessary, to taste
INSTRUCTIONS
Step 1: Gather your ingredients.

Step 2: Add your eggs to a pot and fill with cold water. Bring to a full boil, and then set a timer for 8 minutes.
While you certainly don't need to use this, I find using a basket strainer to hard-boil eggs makes the job a bit easier!


Step 3: After the eggs are cooked, run them under cold water to stop the cooking process and ensure that they are easier to handle. Place the eggs in a medium mixing bowl with cool water for a few minutes.


Step 4: Peel the eggs. A little trick I've found to make peeling eggs much easier is:
- Using eggs that have been sitting in your fridge for at least a few days, not just purchased from the grocery store and...
- Running the eggs under cool water while you peel them. This really helps!

Step 5: Gather your cutting board, large mixing bowl, paring knife, damp paper towel, your bowl of peeled eggs and your storage container. I love this one from Snapware, which makes storing, carrying and serving deviled eggs easy-peasy, but you could easily use any lidded container deep enough or even a large plate.

Cut your hard-boiled eggs in half lengthwise, dividing eggs into 2 equal halves. Pop the center yolks into your mixing bowl and place your whites into the storage container. If needed, wipe the blade of your paring knife with the damp paper towel after each use.

Step 6: Move your mixing bowl back onto the KitchenAid base or get your hand-held beaters ready. To the bowl, add your mayonnaise, pickle juice, and season with freshly cracked black pepper. Mix thoroughly to ensure your deviled egg filling is super creamy with no lumps of egg yolk. Stop the mixer every so often to scrape down the sides and the bottom.


Make sure to taste your filling. In my experience, I rarely need to add salt but adjust accordingly, based on your preference.

Step 7: If using a pastry bag, place the star (or preferred decorator tip) at the bottom of the bag and snip off the end. Twist the bag at the base ABOVE the tip and push the twisted end down into the tip. This will help keep the filling locked in until you are ready to fill your eggs.
Place the pastry bag over the glass and fold the top of the bag over. Spoon in the filling using a rubber spatula. Once filled, fold the top of the bag back over the filling and twist. If not using a pastry bag, simply follow the same steps using a Ziploc bag, securing the filling by sealing the top of the bag. When ready to pipe, snip one corner of the bottom of the bag.


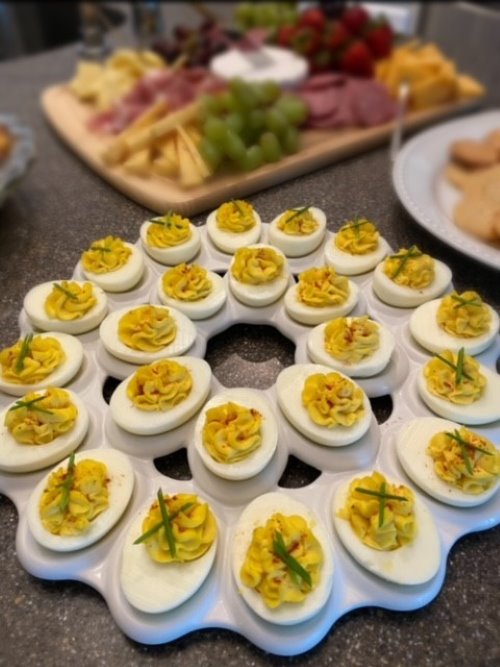
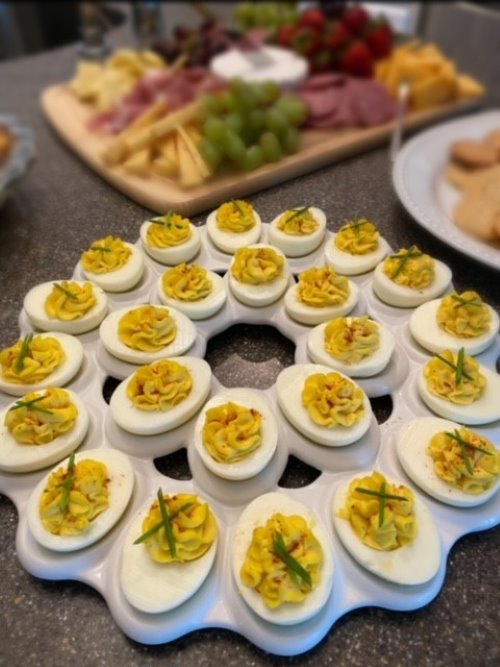
Step 8: Carefully pipe an even amount of filling into each egg white half, swirling around to create a pretty pattern.

Once all of the eggs have been filled, sprinkle the tops LIGHTLY with paprika.

Before serving, feel free to add a few, freshly snipped chives, if desired. While I purchased the ceramic deviled egg platter photographed here at a local store, there are several similar options on Amazon, such as the one linked above.

Perfect Deviled Eggs
Equipment
- Medium-Sized Pot
- Kitchen-Aid Mixer or handheld mixer
- Measuring Cups and Spoons
- Medium Mixing Bowl
- Cutting Board
- Paring Knife
- Damp Paper Towel
- Tall glass optional
- Rubber Spatula
- Pastry Bag with Star Tip or Ziploc Bag
- Scissors
- Deviled Egg Storage Carrier Optional
- Serving Platter Optional
Ingredients
- 6 Large Eggs preferably not 'too' fresh
- ¼ Cup Mayonnaise
- ¼ tsp. Yellow Mustard
- 2 tsp. Pickle Juice
- ¼ tsp. Freshly Cracked Black Pepper
- Paprika optional
- Chipped Chives optional
- Kosher Salt ONLY if necessary, to taste
Instructions
- Gather your ingredients.
- Add your eggs to a pot and fill with cold water. Bring to a full boil, and then set a timer for 8 minutes.
- After eggs are cooked, run them under cold water to stop the cooking process and ensure that the eggs are easier to handle. Place the eggs in a medium mixing bowl with cool water for a few minutes.
- Peel the eggs. A little trick I've found to make peeling eggs much easier is 1) Using eggs that have been sitting in your fridge for at least a few days, not just purchased from the grocery store, and 2) running them under cool water while you peel them. This really helps!
- Gather your cutting board, large mixing bowl, paring knife, damp paper towel, your bowl of peeled eggs and your storage container. I love this one from Snapware, which makes storing, carrying and serving deviled eggs easy-peasy, but you could easily use any lidded container deep enough or even a large plate.
- Cut your hard-boiled eggs in half lengthwise, dividing eggs into 2 equal halves. Pop the center yolks into your mixing bowl and place your whites into the storage container. If needed, wipe the blade of your paring knife with the damp paper towel.
- Move your mixing bowl back onto the KitchenAid base or get your hand-held beaters ready. To the bowl, add your mayonnaise, pickle juice, and season with freshly cracked black pepper. Mix thoroughly to ensure your deviled egg filling is super creamy with no lumps of egg yolk. Stop the mixer every so often to scrape down the sides and the bottom.
- Make sure to taste your filling. In my experience, I rarely need to add salt but adjust accordingly, based on your preference.
- If using a pastry bag, place the star (or preferred decorator tip) at the bottom of the bag and snip off the end. Twist the bag at the base ABOVE the tip and push the twisted end down into the tip. This will help keep the filling locked in until you are ready to fill your eggs.Place the pastry bag over the glass and fold the top over. Spoon in the filling using a rubber spatula. Once filled, fold the top of the bag back over the filling and twist.If not using a pastry bag, simply follow the same steps using a Ziploc bag, securing the filling by sealing the top of the bag. When ready to pipe, snip one corner of the bottom of the bag.
- Carefully pipe an even amount of filling into each egg white half, swirling around to create a pretty pattern.
- Once all of the eggs have been filled, sprinkle the tops LIGHTLY with paprika. Before serving, feel free to add a few, freshly snipped chives, if desired. While I purchased the ceramic deviled egg platter photographed here at a local store, there are several similar options on Amazon, such as the one linked above.
Notes
- Eggs that are fresh will sink to the bottom and lay on their side.
- Eggs that are a few weeks old (but still perfectly fine to eat) will initially sink to the bottom but will then stand upright on one end. These are typically the perfect eggs for hard-boiling.
- Eggs that have gone bad will float to the top and should be discarded.

